Long time not write any articles, this time I'm gonna introduce the InfoPath Programming.
First of all, let me show you why we need to use InfoPath. I work for a small company and our company has a private corp net. The corp net includes one database, a couple of services and some applications. Our goal is gather all clients' feedback and save them into our database.
However, the limitation is we cannot open a public web application because of the security reason. That means we must have some other plans to gather all information. Also, we also don't want to use Excel/Word because clients may easy to change the format and it's hard for us to import the data into our database. Then, we think about the InfoPath.
As you known, we can use InfoPath to design a powerful form and let user to fill out the form and then send it back. To use the InfoPath to complete our task, we assume:
1. All users have the InfoPath installed
2. All users won't change the form design
Before starting the programming, we need to understand the InfoPath Security settings. The basic concept is if you need the InfoPath to access any resource out of the form, then you need a domain/full trust level. Otherwise, you can use restricted level. The more details can be found from
here.
This article is talking about how to program with InfoPath. Now, let's go the way.
Create Fields for your form
-------------------------------------------------------------------
1. Click Start -> All Programs -> Microsoft Office -> Microsoft InfoPath Designer 2010 (You may use Microsoft Info Designer 2007, it doesn't matter)
2. Select the form template and then click 'Design Form'. For me, I'm gonna use 'Blank Form'.
3. Change some settings. I don't want the InfoPath generates some fields automatically when I insert the control, so I'm gonna change the default settings.
a. Click the small button from the ribbon, then you will the additional control panel.
b. Un-check the 'Automatically create data source' checkbox.
4. Now, we can start to design our InforPath form. Let's create some fields first. Close the control panel, right click 'myFields' item from the Fields Panel.
5. Click the 'Properties' menu item.
6. In the pop up dialog, change the name of the field and then click the OK button. Note: this field will become the root node of your xml file.
7. Now, I'm gonna create some fields under the root node. Right click the the Customer node, and then click 'Add' from the menu item. In the pop up dialog, enter the field name and keep the other settings. Click the OK button.
8. Create another field. This time, select Rich Text from the Data type.
9. Now, we assume we need to gather their products. Absolutely, one company may have a lot of products, it's a collection. That means we need to create a repeatable table.
Right click the Customer item, click add from the menu item. Enter a name for the collection, select 'Group' from the 'Type' drop down list and check the 'Repeating' checkbox, and then click the OK button.
10. Then we can add some fields for the product object. Just simple repeat step 7 to add your fields.
Now, all fields are created and we are ready to design the form.
Design InfoPath Form
-----------------------------------------------------------------------------
1. Change form title. Click the 'Click to add title' and then enter the form title.
2. Click the 'Add tables' to edit the form title and then click the 'Add tables'.
3. Right click the 'Name' from the Fields Panel, and then click the Text Box control.
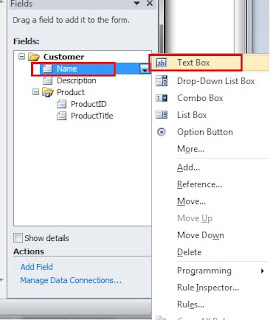
4. Then a Text Box should be created in the form.
5. Right click the 'Description' from the fields panel and then click the 'Rich Text Box', then a rich text box shows up.
6. Right click the 'Product' group, and then click 'Repeating Table'. The result are:
7. All controls are created but there is no label here. We can add some labels like the pic blow.
8. Now, we can start to test it. Save it in your disk and then double click the xsn file to open a new form.
Programming with InfoPath
-------------------------------------------------------------------------------
So far, we already have the form and customers can use this form to fill out their information. However, we have some data saved in our Database. Our goal is to ask customers update their information based on the current data we have. So we have to read data from database, fill out the form and then send it to the customer. Once they update the information, send it back to us, then we'll upload the data to our database. In this article, I won't explain how to get data from database. Instead, I just introduce how to work with the InfoPath form.
First of all, we need to setup a project to add custom code.
1. Right click the form, then click the "Design"
2. Click "File" -> "Form Options"
3. Click "Programming" from the left tab
4. Change the programming language and the project path, Click OK button to close the dialog. For me, I'm gonna use C# to be the programming language
5. Click "Developer" > "Code Editor"
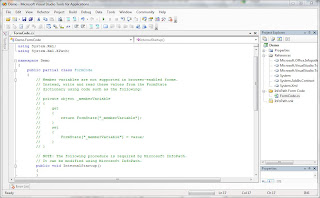
6. Then you will see the code editor, which is a Microsoft Visual Studio Tools for Applications
7, To insert a new record into the Products list, I want to have a button, which will insert a new line into the Product list when users click it. Now, close the code editor and go back to the form designer. Add a new button under the Product list.
8. Click the 'Properties' from the ribbon and then click the 'Control Properties'. In the pop up dialog, we can change it to a new label, like 'Insert'. And then click the OK button
9. Click the 'Custom Code' button from the ribbon. You will launch the code editor again. Now, you will see the 'Clicked' event handler method.
10. OK. Now, as I mentioned before, when users click the button, we need to insert a new record into the repeatable table. Enter the following code in the CTRL6_5_Clicked method:
1: string myNamespace = this.NamespaceManager.LookupNamespace("my");
2: System.Text.StringBuilder sBuilder = new System.Text.StringBuilder();
3: sBuilder.AppendFormat("<my:Product xmlns:my=\"{0}\">", myNamespace);
4: sBuilder.AppendFormat("<my:ProductID xmlns:my=\"{0}\"></my:ProductID>", myNamespace);
5: sBuilder.AppendFormat("<my:ProductTitle xmlns:my=\"{0}\"></my:ProductTitle>", myNamespace);
6: sBuilder.Append("</my:Product>");
7:
8: this.MainDataSource.CreateNavigator().SelectSingleNode("/my:Customer", this.NamespaceManager).AppendChild(sBuilder.ToString());
11. Now, you can build your project to generate the custom InfoPath Form. Click the 'Build' from the menu and then click 'Build Demo' menu item.
12. Close the 'Visual Studio Tools for Application' and then save your InfoPath Form.
13. Double click the xsn file to open a new form, click the Insert button, you will see a new line is inserted.