Tuesday, February 3, 2015

Install fcitx for KDE with Fedora

Install fcitx

1. Use root account
2. Run following commands to install fcitx:

yum install fcitx, fcitx-qt4, fcitx-configtool, fcitx-cloudpinyin, fcitx-pinyin, fcitx-table, fcitx-table-chinese, kcm-fcitx

Configure fcitx

After install fcitx, you need to configure it
1. Create a fcitx.sh file in /etc/profile.d/
2. Add following code to this file:

export XMODIFIERS="@im-fcitx"
export QT_IM_MODULE=fcitx
export GTK_IM_MODULE=fcitx

Now, restart your computer and you should be good to go. Open a konsole, run fcitx and it should be started.

Autostart fcitx

If you want to have fcitx auto start with your kde, you need to run following command:

ln -s /usr/share/applications/fcitx.desktop ~/.config/autostart/fcitx.desktop

Restart your computer and you should see the difference.

Thursday, February 27, 2014

Install official nvidia driver on Arch Linux with my Lenovo Y400 (video card GT 650M)

I must be a stupid guy because it took me 2 weeks to resolve this issue. I've been switch drivers between nouvean and nvidia official driver for a long time and I never run it out. :(

1. The issue I met

If you follow the Arch Linux wiki to install the official nvidia driver and found the screen is turned to black, the fan starts spinning and the system completed die after a while, this article may help you out!

2. nvidia driver conflicts with new kernel

I found an article in nvidia forum, which mentioned there is a conflict between nvidia driver and kernel 3.10+. You have to re-compile your kernel, update your initramfs and then add a parameter to your boot file.

3. Recompile kernel

Download the latest kernel from http://www.kernel.org/
Change your .config file
from:
  1. # CONFIG_HZ_100 is not set
  2. # CONFIG_HZ_250 is not set
  3. CONFIG_HZ_300=y
  4. # CONFIG_HZ_1000 is not set
  5. CONFIG_HZ=300
to:
  1. # CONFIG_HZ_100 is not set
  2. # CONFIG_HZ_250 is not set
  3. # CONFIG_HZ_300 is not set
  4. CONFIG_HZ_1000=y
  5. CONFIG_HZ=1000

Follow the wiki page to compile your kernel
https://wiki.archlinux.org/index.php/Kernels/Compilation/Traditional

Note: remember to re-generate your initramfs file. This is very important

4. Add kernel parameter

Edit your gummiboot file: arch.conf
add a parameter at the end:
rw quiet rcutree.rcu_idle_gp_delay=1

Then reboot your system.

Now, test your xort with startx. You should be OK.

Install nouvean driver on Arch Linux with my Lenovo Y400 (video card GT 650M)

Install the open source nouvean video driver with Lenovo Y400 (with nvidia GT 650M) should be easy. Just follow the official wiki page should be good.

1. Install Arch Linux

If you already install the arch linux, you may skip this section. Just install Arch Linux follows the official wiki without installing xorg.
https://wiki.archlinux.org/index.php/Beginners%27_guide

2. Install nouvean

By default, the nouvean module should be loaded after you installed the Arch Linux. You can use the following command line to double check if the module is loaded.

lsmod | grep nouvean

If it's loaded, you can continue installing the nouvean driver. Follow the wiki page to finish that.
https://wiki.archlinux.org/index.php/nouveau

After that, reboot your linux and then check if the module is loaded again.


3. Install xorg

Now it's the time to install xorg. Follow the wiki page to finish your installation.
https://wiki.archlinux.org/index.php/Beginners%27_guide

After the installation, I still reboot my linux and check if the nouvean is loaded. But I guess you can skip this step.

4. Install KDE

I'm a KDE guy. So it's the time for me to install KDE. You can install other EE as your wish.

Monday, September 10, 2012

Moving all databases to another server without changing connection string

Today I'm gonna talk about how to moving all databases to another server without changing connection string in web.config, app.config and whatever configuration file.

Problem
Today I met an issue that my current SQL Server needs to be operated for some reasons and the SQL Server service will be offline for a few days. Our application is a global service for the company and it can't be offline for a long time. This means we have to move all databases from the current server to a backup server.

Solution
The basic idea is that create a backup server and restore all databases on it. Then setup a redirect function on the original server so that all requests can be redirected to the new server. This function is called "Alias" in SQL Server, which can be configured in Sql Server Configuration Manager -> SQL Native Client.

There are two summary steps to complete this solution:
1. Backup all databases from the original databases and restore them on the backup server.
2. Setup an Alias on the original server to redirect all requests to the backup server.

A. Backup and Restore
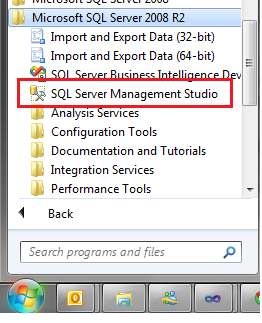
1. Open your SQL Server Management Studio from Start -> All Programs -> Microsoft SQL Server 2008 -> SQL Server Management Studio
2. Login to the current DB server with your credential.
3. Right click you database, select Tasks -> Back Up...
4. Change the backup directory, and then click OK.
5. Copy the backup file to the new DB Server.
6. Follow step 1 to login the new DB server.
7. Right click the Databases node and then click the Restore Database...
8. Select From device, choose the backup file, and then select the database name from the To database drop down list. Click OK button.
9. Now, you have moved the target database from the original server to the backup server.

B. Setup Alias
After you move all database from the original server to the backup server, the next step is setup a redirect settings in the original server to redirect all requests to the backup server. This setting is called 'Alias' in SQL Server.

1. Select SQL Server Configuration Manager from Start -> All Programs -> Microsoft SQL Server 2008 -> Configuration Tools
2. Expand the SQL Native Client 10.0 Configuration -> Aliases. Generally there will be two menus, one is for 32 bit, the other is for 64 bit.
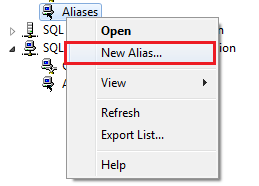
3. Right click the Aliases, select New Alias...
4. There are four fields need to be entered. The Alias Name, the Port No, the Protocol and the Server.
The Alias Name should be the 'Data Source' in your connection string
The default Port No is 1433
The Protocol should choose TCP/IP
The Server field should be the new SQL Server name.
5. After filling this dialog, click OK button to complete the setup. Make sure you setup the alias both in 32 bit and 64 bit.
6. Now, you backup server is ready to go. Disable you current SQL Server service and try your applications, it should work.

Friday, June 22, 2012

Best Practices for Speeding Up Your Web Site

Best Practices for Speeding Up Your Web Site

MVC knowledge

1. Custom Helper
Create a new Class and use the following code
public static class MyHtmlHelper
{
    public static MvcHtmlString Image(this HtmlHelper helper, string src, string altText)
    {
        var builder = new TagBuilder("img");
        builder.MergeAttribute("src", src);
        builder.MergeAttribute("alt", altText);
        return MvcHtmlString.Create(builder.ToString(TagRenderMode.SelfClosing));
    }
}
In cshtml layout page, add @using namespace on the top, the use @Html.Image(src, altText) at any place.

If we need to use this method in any layout pages, we should open the web.config file which is under Views folder, add <add namespace="namespace"/> in <namespce> block.

2. Custom Validation
There are two ways to custom the validation. The first one is custom attributes, the second one is use IValidatableObject interface.

Make the model inherits from the IValidatableObject interface, and then implement it. Such as
public IEnumerable<ValidationResult> Validate(ValidationContext validationContext)
{
    // Write your custom validation code here and then
    yield return new ValidationResult("error message", new[] { "fields that against the validation" });
}

In this way, the error message will be displayed behind the fields.

3. Quick add script link
Create the following code in your cshtml layout page,
@helper Script(string scriptName)
{
    <script src="@Url.Content("~/Scripts/" + scriptName)" type="text/javascript" />
}

Then you can use it in your layout page, like @Script("jquery.min.js")
Note: this script method is only available in current layout page, if you want it to be available in any layout pages, you either create a custom helper in C# code or do the following things.

Create a App_Code folder under this Mvc project, create a new MVC view page with name "Content", delete all content in that file, and then type the following code

using System.Web.Mvc;
@helper Script(string scriptName, UrlHelper url)
{
    <script src="@url.Content("~/Scripts/" + scriptName)" type="text/javascript" />
}

Then you can use it in any layout pages, like @Content.Script("jquery.min.js", Url)

Monday, April 23, 2012

[Forward] Running 32-bit SSIS in a 64-bit Environment

Original Source: http://sqlblog.com/blogs/john_paul_cook/archive/2010/03/24/running-32-bit-ssis-in-a-64-bit-environment.aspx

After my recent post on where to find the 32-bit ODBC Administrator on a 64-bit SQL Server, a new question was asked about how to get SSIS to run with the 32-bit ODBC instead of the 64-bit ODBC. You need to make a simple configuration change to the properties of your BIDS solution. Here I have a solution called 32bitODBC and it needs to run in 32-bit mode, not 64-bit mode. Since I have a 64-bit SQL Server, BIDS defaults to using the 64-bit runtime. To override this setting, go to the property pages for the solution. Select the Debugging node. Select Run64BitRuntime and set it to False. Save your changes.
image
What about when you finish your work in BIDS and you want to use the 32-bit runtime outside of BIDS? It depends on where you execute your package from.
If you double-click a dtsx file from Windows Explorer, it is executed by the SQL Server 2008 Integration Services Package Execution Utility. The default fully qualified path for that tool is C:\Program Files (x86)\Microsoft SQL Server\100\Tools\Binn\VSShell\Common7\IDE\DTExecUI.exe. In other words, it is a 32-bit product, so it doesn’t have any trouble running things in 32-bit mode by definition.
Here’s part of the error message generated from executing the package from a SQL Server Agent job using the default settings:
Description: System.Data.Odbc.OdbcException: ERROR [IM014] [Microsoft][ODBC Driver Manager] The specified DSN contains an architecture mismatch between the Driver and Application
The clue is the part about the architecture mismatch. Using the 64-bit runtime is the default behavior. Fortunately this is easy to change within the job definition by checking the Use 32 bit runtime checkbox.
image